
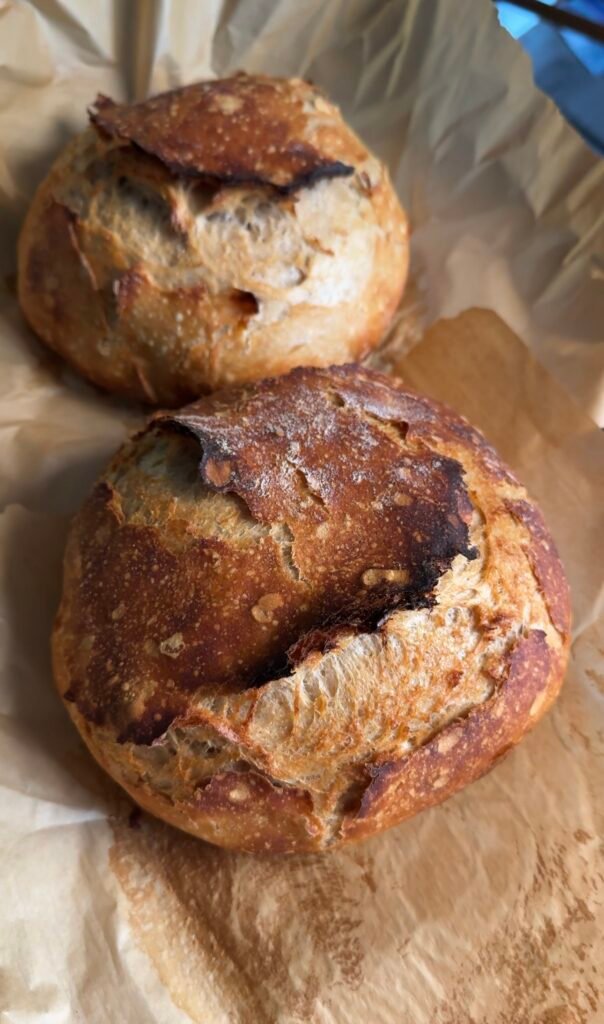
If you have been wanting to bake real sourdough at home but the process feels intimidating, this Classic Sourdough Bread is the perfect place to start. It uses just six ingredients, there is no kneading involved, and the Dutch oven does most of the work for you. The result is a loaf with a deep golden, crackly crust and a soft, chewy, tangy crumb.
This recipe blends bread flour with a little whole wheat flour, which adds a nutty, wholesome flavor and a bit of extra fiber without making the loaf heavy. A touch of raw honey helps feed the fermentation and rounds out the tang, and a gentle series of stretch and folds builds structure in place of kneading.
Sourdough is mostly about patience, not skill. Once you understand the rhythm of mixing, folding, and watching the dough grow, you can make a bakery-quality loaf in your own kitchen with simple, real ingredients.
Here is what you need and why each ingredient matters:
Flour swap: If you would like to use all bread flour, go ahead, but hold back a little of the water at first. Whole wheat flour absorbs more liquid, so a dough made with only white flour can feel looser.
In a large bowl, add the 395 grams of water, 5 to 10 grams of raw honey, 12 grams of salt, and 75 to 100 grams of active starter. Stir until the starter and honey are mostly dissolved.
Add the 150 grams of whole wheat flour and 350 grams of bread flour. Mix until no dry flour is left, but do not knead. The dough will look shaggy and rough, and that is exactly what you want.
Cover the bowl and let the dough rest for 30 to 60 minutes. Then do your first set of stretch and folds: grab one edge of the dough, gently stretch it up, and fold it over the center. Rotate the bowl and repeat all the way around.
Continue with 2 to 3 more sets of stretch and folds over the next 2 hours, spacing them out as the dough relaxes. By the end, the dough will be soft but will hold its shape much better than when you started.
Pro Tip: Wet your hands with a little water before each fold. It keeps the dough from sticking to you and makes the folds much easier.
Cover the dough and leave it at room temperature until it grows about 50% in size. This takes roughly 6 to 12 hours, depending on the temperature of your room. In a warm house it will be on the shorter end. In a cooler kitchen, or if you want a more developed, tangier flavor, it can go longer.
Watch the dough instead of the clock. You are looking for a puffy, jiggly dough with some bubbles on the surface and around the edges.
Turn the dough out onto a lightly floured surface. Take each of the four ends and fold each one over the other side. Flip the dough over so the folded seams are on the bottom and you have a smooth, rounded top. Gently cup the sides and rotate in a circular motion to tighten the shape. The goal is to build surface tension to create a tight ball. Let the shaped loaf sit and warm up on the counter while your oven preheats. This is the final proofing process and you can wait to start the oven as final proofing should take 2-4 hours.
Preheat your oven with the Dutch oven inside to 500°F for 45 to 60 minutes. A very hot Dutch oven helps the loaf rise tall and gives you a crisp crust.
Right before baking, score the top of the loaf with a sharp knife or bread lame. Then carefully place the dough in the hot Dutch oven. Use sturdy oven mitts, because the pot will be extremely hot.
Put the lid on and bake at 500°F covered for 25 to 30 minutes. The lid traps steam, which keeps the crust soft long enough for the loaf to rise fully.
Lower the oven temperature to 450°F, remove the lid, and bake uncovered for another 25 to 30 minutes, until the crust is deep golden brown.
Transfer the loaf to a wire rack and let it cool before slicing. The inside is still setting as it cools, and cutting too early can give you a gummy crumb. It is hard to wait, but it is worth it.
Store your cooled loaf cut-side down on a cutting board, or in a bread bag or cloth, at room temperature for 2 to 3 days. To keep it longer, slice the loaf and freeze the slices in a freezer-safe bag for up to 3 months. Toast slices straight from frozen.
Your starter should be bubbly, noticeably risen, and smell pleasantly tangy. This is usually 4 to 8 hours after feeding, depending on the temperature of your kitchen.
No. The stretch and folds build the gluten structure for you. You mix until there is no dry flour, rest the dough, and fold it a few times over about 2 hours.
Until it has grown about 50%. This usually takes 6 to 12 hours, depending on the temperature of your room. In a warm kitchen it will be on the shorter end, and in a cooler kitchen, or for extra flavor, it can take longer.
The covered pot traps steam released by the dough, which helps the loaf expand fully and creates a crisp, crackly crust. Removing the lid for the second half browns the crust.
Yes. You may want to start with a little less water, since white flour absorbs less than whole wheat.
Estimated using King Arthur Unbleached Bread Flour and King Arthur Whole Wheat Flour, 7.5 g honey, and 87.5 g of a 100% hydration starter. Actual values vary with your flour, starter amount, and how thick you slice.
Homemade sourdough takes a little time, but most of it is hands-off. With a few simple ingredients and some patience, you end up with a loaf that tastes better than anything off a store shelf. Once you master this classic recipe, you can use it as the base for countless variations.
Looking for more sourdough ideas? Try my [Sourdough Ciabatta], [Sourdough English Muffins], and [Sourdough Focaccia]. [ADD INTERNAL LINKS WHEN THESE POSTS ARE LIVE]
Cooking to nourish the body and serve with joy. Viky
A no-knead classic sourdough loaf made with whole wheat and bread flour, bubbly starter, and a touch of honey, baked in a Dutch oven for a crackly crust.
Turn the dough out onto a lightly floured surface. Take each of the four ends and fold each one over the other side. Flip the dough over so the folded seams are on the bottom and you have a smooth, rounded top. Gently cup the sides and rotate in a circular motion to tighten the shape. The goal is to build surface tension to create a tight ball. Let the shaped loaf sit and warm up on the counter while your oven preheats. This is the final proofing process and you can wait to start the oven as final proofing should take 2-4 hours.
Nutrition: ~165 calories, 6 g protein, 34 g carbs, 2 g fiber per slice (12 slices)


